LANDesk Antivirus is one of the major components of LANDesk Security Suite. Antivirus protects your managed devices from malicious virus attacks by scanning and cleaning viruses based on the latest known virus definition files.
Antivirus offers configurable virus protection features, including scheduled and on-demand virus definition file updates, pilot tests, configurable antivirus scan operation and end user interactive options, infected object handling, real-time file and e-mail protection, status and activity views, reports, and more.
Read this section to learn about:
LANDesk Antivirus is comprised of a built-in antivirus agent scanner, a continuously updated virus signature database, and antivirus configuration options and features available in the Security Configurations tool.
NOTE: Antivirus
agent
The Antivirus agent is distinct from the Patch and Compliance
security scanner.
LANDesk Security Suite services maintains a current database of virus definition/pattern files that can be downloaded, evaluated and tested, and distributed to target devices on your network.
With Antivirus, you can:
When you install LANDesk Management Suite or LANDesk Security Suite, the Patch and Compliance tool is included by default. However, without a Security Suite content subscription, you can only scan for LANDesk software updates and custom definitions. A Security Suite content subscription enables you to take full advantage of the Patch and Compliance tool (and Security Configurations tool) by providing access to additional security content (definition types), including antivirus scanner detection rules and the actual Antivirus virus definition files used by the antivirus scanner.
Security content types include:
For information about Security Suite content subscriptions, contact your LANDesk reseller, or visit the LANDesk Web site.
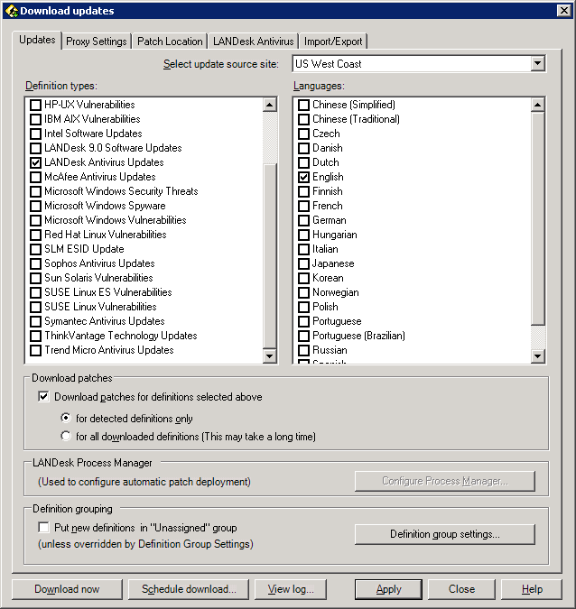
Note that the Updates page of the Download updates dialog box includes several antivirus updates in the definition types list, including one named LANDesk Antivirus Updates. When you select LANDesk Antivirus Updates, both the scanner detection content AND the LANDesk Antivirus virus definition file updates are downloaded.
For third-party scanner engines, antivirus updates include scanner definitions that detect:
For the Antivirus scanner, antivirus updates includes not only the scanner detection content listed above, but also the virus definition files used by the Antivirus scanner.
NOTE: Antivirus
scanner detection content versus virus definition content
Antivirus updates does not imply actual virus definition/pattern
files. When you download third-party antivirus updates, only
scanner detection content is downloaded to the default repository,
but scanner-specific virus definition files are not downloaded.
However, when you download Antivirus updates, both the scanner
detection content AND the Antivirus-specific virus definition files
are downloaded. Antivirus virus definition files are downloaded to
a separate location on the core server. The default virus
definition file repository is the \LDLogon\Antivirus\Bases
folder.
Antivirus supports most of the same platforms supported by Patch and Compliance's security scanning capabilities and the standard LANDesk-managed device platforms, including the following operating systems:
NOTE: Reboot
required for Windows NT 4.0 machines
In order for the Antivirus service to be activated, Windows NT 4
machines must be rebooted after agent configuration deployment.
Make sure the managed devices you want to configure with the Antivirus agent meet the following system requirements:
LANDesk Antivirus, just like Patch and Compliance, uses role-based administration to allow users access to features. Role-based administration is the access and security framework that lets Administrators restrict user access to tools and devices. Each user is assigned specific roles and scope that determine which features they can use and which devices they can manage.
Administrators assign these roles to other users with the Users tool in the console. Antivirus is included in the Security Configurations right, which appears under the Security rights group in the Roles dialog box. In order to see and use Antivirus features, a user must be assigned the necessary Security Configurations access rights.
IMPORTANT: LANDesk
Script Writers group permission required
In order to create scheduled tasks and policies in the Patch and
Compliance tool and the Security Configurations tool (for security
and compliance scan tasks, repair tasks, and change settings
tasks), a user must have the LANDesk Script Writers group
permission. In other words, they must belong to a group that has
the LANDesk Script Writers permission assigned. For more
information about role-based administration, see Role-based administration.
With the Security Configurations right, you can provide users the ability to:
The steps below provide a quick summary outline of the typical processes or tasks involved in implementing antivirus protection on your network with LANDesk Antivirus. Each of these procedures are described in detail in subsequent sections.
Basic steps in implementing and using LANDesk Antivirus:
Before managed devices can be scanned for viruses and cleaned, they must have the Antivirus agent installed. You can do this either during initial device agent configuration or with a separate installation or update task.
If you deploy Antivirus to a device that already has another antivirus solution installed and running, Antivirus does not enable its real-time protection functionality in order to avoid any potential software conflicts. Once you remove the other antivirus product, you can enable Antivirus real-time antivirus protection.
You can select to automatically remove existing antivirus software from target devices when deploying LANDesk Antivirus, either during initial agent configuration or as a separate Antivirus install/update task. For a current list of antivirus products that can be removed from devices, see List of third-party antivirus products that can be automatically removed.
NOTE: Clear
password protected antivirus software
If the existing antivirus software is password protected, you must
first clear the password before Antivirus can uninstall the
software.
Other antivirus products that can be automatically removed when deploying (or updating) LANDesk Antivirus include:
You can also configure devices for Antivirus with the Security Configurations tool.
If you want to install or update Antivirus at a later time, you can do so as a separate task from the console.
Use the Security Configurations tool (Tools > Security > Security Configurations) to create install or update tasks, remove tasks, and antivirus definition file update and scan tasks.

If you want to remove Antivirus from managed devices, you can also do that as a separate task.
Antivirus lets you download the most current virus definition files from the LANDesk Security Suite content servers. The virus signature database is updated several times a day in order to ensure you have all of the latest known virus definitions so that you can protect your managed devices from these rapidly evolving threats.
You can download virus definition file updates from the console, either immediately as a one-time task or as a regularly scheduled task.
Use Download updates (Security Configurations > Download Updates) to specify where definition files are copied, whether they are stored in the default virus definition file repository where they are deployed to target devices or in a pilot test folder where they can be deployed to a limited scope of devices in order to test them before full deployment.
You can also access this dialog box directly when creating an Antivirus task. For more information, see Scanning devices for viruses.
NOTE: Deploying
virus definition files to end user devices
The virus definition updates that you download can be deployed to
end user devices remotely from the core server. From their own
computer, users can also perform the task of updating virus
definition files. By default they download files from their LANDesk
core server. However, if they need to be able to download the
latest virus definition updates while they're not connected to the
network (for example, while traveling or using a laptop), you can
provide the option of letting users download files directly from
the LANDesk security content server via an Internet connection.
NOTE: Whenever virus definition files are updated on managed devices, a mini-scan of memory processes runs on the device. This scan is performed to ensure that the processes running in memory at the time of the update are still clean.
You can also configure virus definition file updates as a scheduled task to occur at a set time in the future, or as a recurring task.
To do this, configure security content download options in the Update downloads dialog box, making sure to select LANDesk Antivirus updates in the definition type list on the Updates tab, configure virus definition file options on the LANDesk Antivirus tab, and then click the Schedule Update button. The Scheduled update information dialog box shows task-specific settings for the task. Enter a name for the task, and then click OK to create a Download Security Content task in the Scheduled Tasks tool, where you can specify the scheduling options.
NOTE:
Task-specific settings and global settings
Note that only the definition types, languages, and definition and
patch download settings are saved and associated with a specific
task when you create it. Those three settings are considered task
specific. However, all of the settings on the other pages of the
Download updates
dialog box are global, meaning they apply to all subsequent
security content download tasks. Global settings include: patch
download location, proxy server, spyware autofix, security alerts,
and antivirus. Any time you change a global settings it is
effective for all security content download tasks from that point
on.
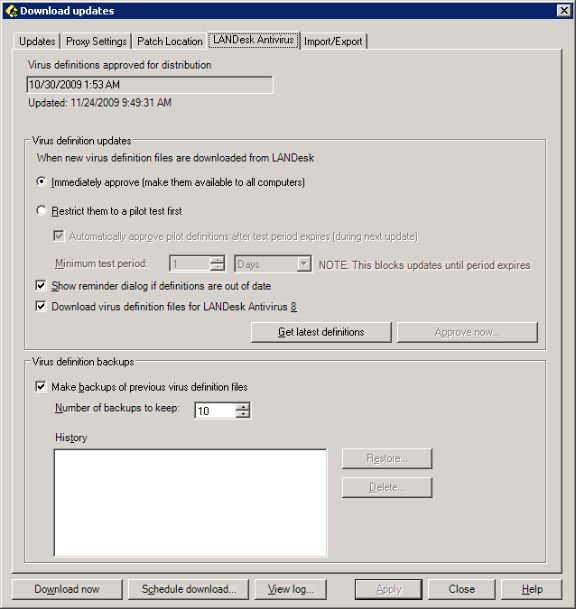
You may want to first evaluate virus definition files before deploying them to all of your managed devices. You can easily do this by specifying to restrict virus definition file updates to a pilot test folder, and then applying an antivirus settings with the Download pilot version of virus definition files option selected.
If you want to save older versions of downloaded virus definition files, use the Virus definition backups settings on the LANDesk Antivirus tab.
Backing up virus definition files can be very useful if you need to go back to an older virus definition file to scan and clean specific infected files, or to restore a virus definition file that resolved a particular problem.
Virus definition file backups are saved in separate folders, named by the date and time the files were saved, under the parent \LDLogon\Antivirus\Backups\ folder.
This section provides information on scanning managed devices for known viruses as well as suspicious objects.
NOTE: Scanning
requires the proper content subscription
Remember that in order to scan for a specific security content
type, including viruses, you must have the corresponding
LANDesk Security
Suite content subscription. For information about content
subscriptions, contact your LANDesk reseller, or visit the LANDesk
Web site.
There are several different methods of running an antivirus scan on managed devices that have Antivirus installed:
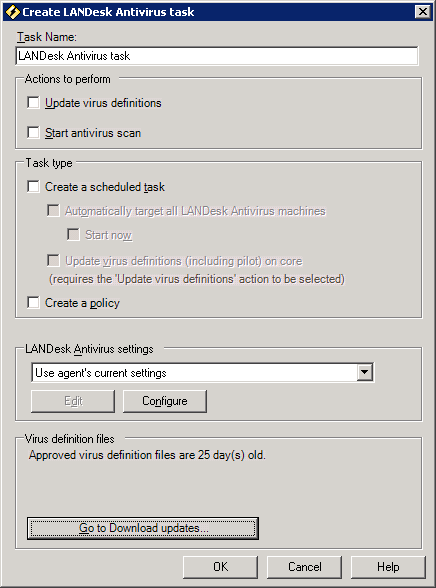
From the console, you can configure antivirus scan tasks that can be run as either an on-demand scan or as a scheduled task or policy.
Scheduled task remediation can be thought of as a push distribution because the patch is pushed from the core server to devices, while a policy is considered a pull distribution because the policy agent on the device checks the core server for applicable policies and then pulls the patch from the core server.
You can also run an immediate on-demand antivirus scan on one or more target devices.
To do this, right-click the selected device (or up to 20 multi-selected devices), click LANDesk Antivirus scan now, select an antivirus settings, choose whether to update virus definition files before scanning, and then click OK.
When you click OK, the Status of requested actions dialog displays the following information:
Additionally, if you've configured antivirus settings to display the Antivirus icon in the device system tray, end users can perform their own on-demand antivirus scans.
To do this at the managed device, right-click the LANDesk Antivirus taskbar icon, and then select Scan my computer. Or from the Antivirus dialog box, click Scan my computer.
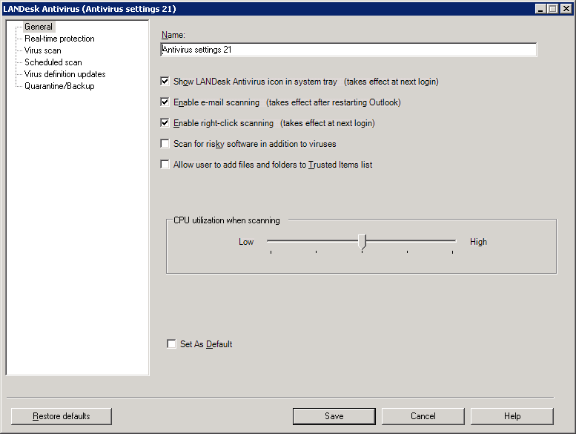
Real-time antivirus protection provides ongoing background scans of specified files, file types, e-mail messages, and e-mail attachments, based on known virus definitions. You can also enable real-time notification to inform end users about infected files.
Real-time file protection, e-mail scanning, and notification are all configured with antivirus settings.
NOTE: LANDesk
Antivirus system tray icon indicator
When real-time antivirus protection is enabled, the LANDesk
Antivirus system tray icon (on the end user device) is yellow. When
real-time protection is disabled, the icon is gray.
Configure real-time file protection with the options on the Real-time protection page of the Antivirus settings dialog box. For more information, click Help.
When real-time protection is running, files are scanned for viruses every time the file is:
Configure real-time e-mail scanning with the Enable e-mail scanning option on the General page of the Antivirus settings dialog box.
Real-time e-mail protection provides on ongoing scan of incoming and outgoing messages. Antivirus scans the message body as well as attached message's bodies and file attachments.
Antivirus real-time e-mail protection supports:
When real-time e-mail protection is running, messages and attachments are:
When an infected e-mail is discovered on a managed device, Antivirus attempts to clean it. If it can be cleaned: a new header is placed in the message body to inform the end user. If the infected e-mail can't be cleaned: the entire message body is deleted and replaced with a new header.
When a suspicious e-mail message is discovered, the message body is converted to plain text and a header is added to the message.
Also, a dialog displays on the end user device that shows:
End users can be notified when a file infected by a virus is detected, quarantined, deleted, skipped, or cleaned.
Configure real-time infected file notification with the option on the Real-time protection page of the Antivirus settings dialog box.
A dialog displays on the end user device that shows:
Antivirus gives you complete control over how antivirus scans run on target devices, and which options are available to end users. For example, depending on the purpose or scheduled time of an antivirus scan, you may want to show the Antivirus client on end user devices, allow the end user to perform antivirus scans, view and restore quarantined objects, download virus definition file updates on their own, etc. You can do this by creating and applying antivirus settings to a scan task.
With antivirus settings, you can configure the following options:
All of the antivirus settings you create are stored in the LANDesk Antivirus group in the Security Configurations tool.
Create and apply antivirus settings (a saved set of configured options) to antivirus scan tasks. You can create as many antivirus settings as you like. Antivirus settings can be designed for a specific purpose, time, or set of target devices.
Once configured, you can apply antivirus settings to antivirus tasks (or to a change settings task).
A device's default antivirus settings are deployed as part of the initial agent configuration. When a specific task has a different antivirus settings associated or assigned to it, the default settings are overridden. You can also choose to use the device's default settings by selecting it when you create a task.
At some point you may want to change these default antivirus settings on certain devices. Patch and Compliance provides a way to do this without having to redeploy an entirely new and complete agent configuration. To do this, use the Change settings task located in the drop-down list of the Create a task toolbar button. The dialog box that appears allows you to enter a unique name for the task, specify whether it is a scheduled task or policy, and either select an existing antivirus settings as the default or use the Edit button to create a new antivirus settings as the default for target devices.
You can discover and/or verify device antivirus settings in their Inventory view.
To do this, right-click the selected device, click Inventory > LANDesk Management > AV Settings.
You can specify which files (items) you want to scan which files you don't want to scan with both antivirus scans and real-time antivirus file protection.
See the following sections for information on customizing what to scan:
Configure to scan all files or infectable files only on the Virus scan and Real-time protection pages of an antivirus settings.
Infectable file types are identified by their format identifier in the file header rather than by their file extension, ensuring that renamed files are scanned.
Infectable files include: document files such as Word and Excel files; template files that are associated with document files; and program files such as Dynamic Link Libraries (.DLLs), communication files (.COM), Executable files (.EXEs), and other program files. See below for a list of infectable file types by the file format's standard or original file extension.
You can also specify what not to scan for with both antivirus scans and real-time file protection. Configure antivirus scan exclusions by adding files, folders, and file types to the exclusion list on the Virus scan and Real-time protection pages of an antivirus settings.
NOTE: Trusted
Items list on managed devices
Note that you can also enable an option that allows end users to
specify files and folders they don't want to be scanned by LANDesk
Antivirus. This feature is called the trusted items list, and is
configured on the General page of an antivirus settings.
You can enable heuristic analysis to check for suspicious (possibly infected) files with both antivirus scans and real-time file protection.
Enable heuristic scanning on the Virus scan and Real-time protection pages of an antivirus settings.
Heuristic analysis scanning attempts to detect files suspected of being infected by an unknown virus (not defined in the virus signature database) by looking for suspicious behavior. Suspicious behavior can include a program that is self-modifying, immediately tries to find other executables, or that is modified after terminating. A heuristic analysis emulates program execution to make protocols of observed suspicious activity, and uses those protocols to identify possible virus infections. In almost all cases, this mechanism is effective and reliable, and rarely leads to false positives.
Antivirus utilizes a heuristic analyzer to verify files that have already been scanned by an antivirus scan based on known virus definitions.
Note that heuristic scanning may negatively affect performance on managed devices.
Antivirus lets you enable scanning for risky software, also known as riskware, on target devices. Risky software is essentially client software whose installation presents a possible but not definite risk for the end user.
For example: adware, proxy-programs, pornware, remote admin utilities, IRC, dialers, activity monitors, password utilities, and Internet tools such as FTP, Web, Proxy and Telnet.
When you specify to scan managed devices for risky software, Antivirus loads an extended database that contains definition files used to perform the scan. The extended database scan requires more time than the standard antivirus scan.
This section describes how Antivirus displays on end user devices with Antivirus installed and what happens when devices are scanned for viruses by an antivirus scan or through real-time virus protection. Possible end user options are listed as well as the actions end users can take when an infected object is discovered by the scan.
If the Show LANDesk Antivirus icon in the system tray option is selected on the device's antivirus settings, the Antivirus client appears and shows the following elements:
If Antivirus is installed on their computer, and their antivirus settings (default or task-specific) allow, users can perform the following tasks:
Note that end users can't configure antivirus scan settings, or disable e-mail scanning.
This process applies to both infected files and e-mail messages.
The infected object is:
If the corresponding option is enabled in their antivirus settings (default or task-specific), end users can restore, delete, and rescan quarantined objects.
When an on-demand antivirus scan is executed, or when the virus definition files are updated, the antivirus scanner automatically scans objects in the quarantine folder to see if any infected files can be cleaned with the current virus definition files.
If a quarantined file can be cleaned, it is automatically restored and the user is notified.
End users can open a backup file to see a header that provides information on the original file location, and the reason for the file being backed up.
Note that only the original user is allowed to delete or modify backup files. The user that is logged in when the infected file is discovered.
You can configure antivirus alerting so that you can be notified when specific virus outbreaks are detected on managed devices in your system. Antivirus uses the standard LANDesk alerting tool.
You define virus outbreak parameters based on the number of managed devices infected by a virus in a specified period of time.
Antivirus alert settings are found on the Antivirus page of the Alert settings dialog box.
You must first configure the antivirus alerts in the Alert Settings tool in the console. Antivirus alerts include:
The following antivirus events can generate antivirus alerts:
Select which alerts you want generated. The time interval option lets you prevent too many alerts. More than one alert (for any antivirus trigger) during the specified time interval is ignored.
You can view the complete antivirus alert history for a device in its Security Information view. Right-click a device, select Security Information, select the Antivirus type in the Type drop-down list, and then select the Antivirus History object.
Antivirus information is represented by several reports in the Reports tool. These reports provide useful information about antivirus scan activity and status for scanned devices on your network.
In order to access the Reports tool, and generate and view reports, a user must have the LANDesk Administrator right (implying full rights) and the specific Reporting roles.
For more information about using the Reports tool, see Reports.
You can also view antivirus scan information in the Web console Executive Dashboard. This data is useful in identifying virus outbreaks and to show antivirus protection over time.
LANDesk Antivirus-specific widgets show: