Devices need the Management Suite agents on them to be fully manageable. Read this chapter to learn about:
The Agent configuration window lets you create new agent configurations for Windows, Linux, and Macintosh devices. The agent configurations you create can then be pushed to clients using the console's Scheduled tasks window.
NOTE: Deploying
agents to Windows 95/98/NT devices
Management Suite no
longer ships with agents that support Windows 95, Windows 98, or
Windows NT devices. You can contact LANDesk Customer Care if you need
the legacy agent that works with these devices.
NOTE: Creating
device configurations for Windows devices not enabled for
management
If you have Windows devices that are part of a Windows domain, you
can push a configuration to those devices even if the
standard LANDesk agent and the remote
control agents aren't present. For more information, see the
deployment documentation on the LANDesk community at http://community.landesk.com.
Management Suite uses agent configurations that you create to deploy agents and agent preferences to managed devices. Once devices have the Management Suite agents on them, you can easily update agent configurations.
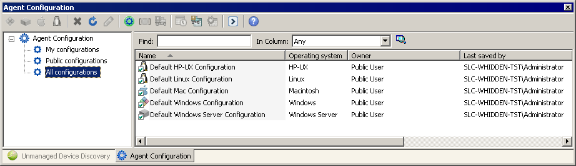
The Agent Configuration tool is used to create and update device and server agent configurations (such as what agents are installed on devices and what network protocols the agents use). Different configurations can be created for department or group specific needs. For example, configurations can be created for the devices in the accounting department or for devices using a particular operating system. For each type of configuration there can only be one default configuration. The default configuration can't be deleted, but it can be edited. It is a good idea not to have too many different configurations, as this makes support and troubleshooting more complex and time-consuming.
Prior to installing any agent software it is necessary to create an agent configuration (or use the default). This involves considerable planning and testing. It is best to deploy the correct configuration the first time, although the agent can be reconfigured and redeployed again if necessary.
An organization may need to have multiple agent configurations. For example, a laptop system might need a different configuration than a desktop system. In order to avoid deploying the wrong agent to the wrong system, it is important to adopt a sensible naming convention for each agent configuration.
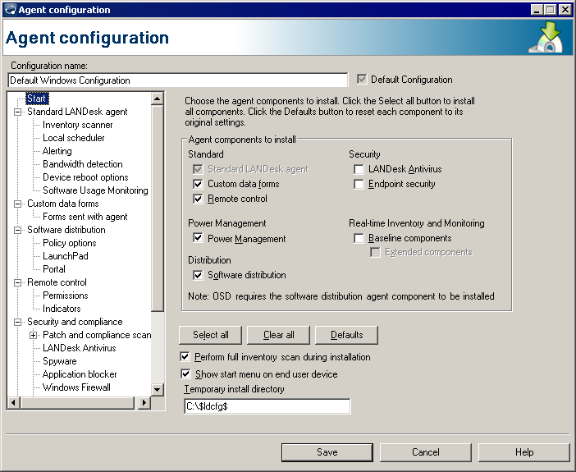
The security and patch scanner agent is installed by default with the standard LANDesk agent. You can configure security scans to determine how and when the security scanner runs on managed devices and whether to show progress and interactive options to the end user. (The security scanner allows you to check for LANDesk software updates on devices and core servers even if you don't have a LANDesk Security Suite content subscription. With a Security Suite subscription you can take full advantage of the security scanner's capability to scan for and remediate known vulnerabilities, spyware, unauthorized applications, viruses, and other potential security risks.)
Before deploying agents, be sure to see the best known methods for agent deployment on the LANDesk user community Web site at http://community.landesk.com/support/community/systems/agent.
IMPORTANT: When
creating agent configurations in mixed-language environments, make
sure the agent configuration name uses only ASCII characters
(English character set). An English core server is compatible with
clients using all supported languages.
However, if the agent configuration name uses a non-ASCII
characters, such as Japanese, Chinese, or Russian, the agent
configuration must be created on a core/console of that same
language and will only work on devices using the same language. For
example, an agent configuration that includes Japanese characters
must be created on a Japanese core, and must be deployed to a
Japanese client.
Read the following sections for more information on:
Use the Agent configuration window to create and update device and server agent configurations (such as what agents are installed on devices and what network protocols the agents use).
You can create different configurations for groups' specific needs. For example, you could create configurations for the devices in your accounting department or for devices using a particular operating system.
To push a configuration to devices, you need to:
To create an agent configuration
The advance agent is the preferred method for deploying the agent in most environments. This agent has been created to leverage LANDesk bandwidth-friendly technology during the agent deployment. It can reduce the amount of network bandwidth used for Windows-based agent configuration. The Advance agent uses a two stage deployment method. The Advance agent is an MSI file that is deployed in advance of the full agent. The MSI installs and then initiates the download and install of the full agent package.
The advance agent works well for most devices, including laptops with intermittent or slow network connections. However, it doesn't support PDAs and other handheld devices.
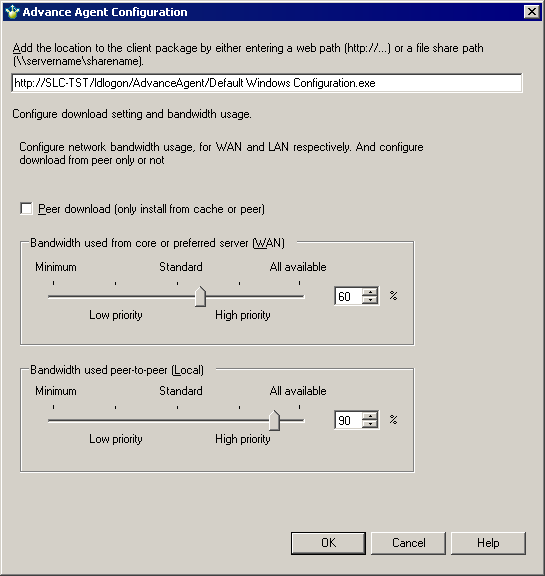
The advance agent is a small 500 KB MSI package. When this package runs on a managed device, it downloads an associated full agent configuration package, which may be up to 15 MB in size, depending on the agents you select. In the Advance agent configuration dialog, you can configure what bandwidth-friendly distribution options the MSI will use for the full agent configuration download.
The advance agent works independently from the core server once it starts downloading the full agent configuration. If a device disconnects from the network before the agent configuration finishes downloading, the advance agent will automatically resume the download once the device is back on the network.
When you create an advance agent configuration, it takes a few seconds for the console to create the full agent configuration package. The console places the advance agent package (<configuration name>.msi) and the newly-created full agent configuration package (<configuration name>.exe) in the core server's LDLogon\AdvanceAgent folder. The file names are based on the agent configuration name.
Once you've created an agent configuration package, you need to run the MSI portion on devices by using one of the following methods:
Once you deploy the advance agent to devices, the advance agent starts downloading the associated agent configuration. The agent runs silently on the managed device, without showing any dialogs or status updates. The advance agent uses the bandwidth preferences you specified in the Advance agent configuration dialog, such as Peer Download and dynamic bandwidth throttling.
Once the MSI installs and successfully configures agents on a device, it removes the full agent configuration package. The MSI portion stays on the device, and if the same MSI runs again it won't reinstall the agents.
If you want to update agent preferences on devices, such as requiring permission for remote control, you don't have to redeploy the entire agent configuration. You can make the changes you want in the Agent configuration window, and from that configuration's shortcut menu click Schedule update. This opens the Scheduled tasks window and creates an update task and package for the configuration you scheduled the update from. This package is only a few hundred kilobytes in size.
Updating preferences won't install or remove agents on a device. If the update contains preferences for agents that aren't on a device, the preferences that don't apply will be ignored.
IMPORTANT: Agent Watcher doesn't support preference changes through scheduled updates. If you want to change Agent Watcher preferences, right-click the device you want in the network view and click Update Agent Watcher settings.
Normally the client configuration utility, wscfg32.exe, configures clients. If you want, you can have the Agent configuration window create a self-extracting single-file executable that installs an agent configuration on the device it's run on. This is helpful if you want to install agents from a CD or portable USB drive, or if you want to multicast an agent configuration.
Management Suite 8 uses a certificate-based authentication model. Device agents authenticate to authorized core servers, preventing unauthorized cores from accessing clients. Each core server has a unique certificate and private key that Management Suite Setup creates when you first install the core or rollup core server.
These are the private key and certificate files:
An alternate method for getting the hash is to use the openssl application, which is stored in the \Program Files\LANDesk\Shared Files\Keys folder. It will display the hash associated with a certificate using the following command line:
openssl.exe x509 -in <keyname>.crt -hash -noout
All keys are stored on the core server in \Program Files\LANDesk\Shared Files\Keys. The <hash>.0 public key is also in the ldlogon folder and needs to be there by default. <keyname> is the certificate name you provided during Management Suite Setup. During Setup, it's helpful to provide a descriptive key name, such as the core server's name (or even its fully qualified name) as the key name (example: ldcore or ldcore.org.com). This will make it easier to identify the certificate/private key files in a multi-core environment.
You should back up the contents of your core server's Keys folder in a safe, secure place. If for some reason you need to reinstall or replace your core server, you won't be able to manage that core server's devices until you add the original core's certificates to the new core, as described below.
Devices will only communicate with core and rollup core servers for which they have a matching trusted certificate file. For example, let's say you have three core servers, managing 5,000 devices each. You also have a rollup core managing all 15,000 devices. Each core server will have its own certificate and private keys, and by default, the device agents you deploy from each core server will only talk to the core server from which the device software is deployed.
There are two main ways of sharing keys among core and rollup core servers:
In our example, if you want the rollup core and Web console to be able to manage devices from all three cores, you need to distribute the rollup core's trusted certificate (the <hash>.0) file to all devices, in addition to copying the same file to each core server's ldlogon folder. For more information, see the next section. Alternatively, you can copy the certificate/private key files from each of the three core servers to the rollup core. This way, each device can find the matching private key for its core server on the rollup core server. For more information, see Copying certificate/private key files among core servers.
If you want one core to be able to manage devices from another core, you can follow the same process, either distributing the trusted certificate to devices or copying the certificate/public key files among cores.
If you are copying certificates between standalone cores (not to a rollup core), there is an additional issue. A core won't be able to manage another core's devices unless it first has an inventory scan from those devices. One way of getting inventory scans to another core is to schedule an inventory scan job with a custom command line that forwards the scan to the new core. In a multiple core scenario, using a rollup core and the Web console is a simpler way to manage devices across cores. Rollup cores automatically get inventory scan data from all devices on the cores that get rolled up to it.
There are two ways you can deploy trusted certificates to devices:
Each additional core server trusted certificate (<hash>.0) that you want devices to use must be copied to the core server's ldlogon folder. Once the trusted certificate is in this folder, you can select it within the device setup dialog's Common base agent page. Device setup copies keys to this folder on devices:
If you want to add a core server's certificate to a device, and you don't want to redeploy device agents through device setup, create a software distribution job that copies <hash>.0 to the folder specified above on the device. You can then use the Scheduled tasks window to deploy the certificate distribution script you created.
The following is an example of a custom script that can be used to copy a trusted certificate from the ldlogon folder of the core server to a device. To use this, replace "d960e680" with the hash value for the trusted certificate you want to deploy.
; Copy a trusted certificate from the ldlogon directory of the core server
; into the trusted certificate directory of the client
[MACHINES]
REMCOPY0=%DTMDIR%\ldlogon\d960e680.0, %TRUSTED_CERT_PATH%\d960e680.0
An alternative to deploying certificates (<hash>.0) to devices is to copy certificate/private key sets among cores. Cores can contain multiple certificate/private key files. As long as a device can authenticate with one of the keys on a core, it can communicate with that core.
NOTE: When using
certificate-based remote control, target devices must be in the
core database
If you're using certificate-based remote control security with
devices, you can only remote control devices that have an inventory
record in the core database that you're connected to. Before
contacting a node to launch remote control, the core looks in the
database to ensure the requesting party has the right to view the
device. If the device isn't in the database, the core denied the
request.
Care should be taken to make sure that the private key <keyname>.key is not compromised. The core server uses this file to authenticate devices, and any computer with the <keyname>.key file can perform remote executions and file transfer to a Management Suite device.
When creating agent configurations in mixed-language environments, make sure the agent configuration name uses only ASCII characters (English character set). An English core server is compatible with all supported languages. However, if the agent configuration name uses a non-ASCII characters, such as Japanese, Chinese, or Russian, the agent configuration must be created on a core/console of that same language and will only work on devices using the same language. For example an agent configuration that includes Japanese characters must be created on a Japanese core, and must be deployed to a Japanese client.
Prior to Management Suite 8.5, anyone could uninstall Management Suite agents by running wscfg32.exe with the /u parameter. Since wscfg32.exe was in the LDLogon share, which managed devices could access, it was relatively easy for users to uninstall Management Suite agents.
With Management Suite 8.5 and later, the /u parameter has been removed from wscfg32.exe. There's a new utility called UninstallWinClient.exe in the LDMain share, which is the main ManagementSuite program folder. Only administrators have access to this share. This program uninstalls Management Suite or Server Manager agents on any device it runs on. You can move it to any folder you want or add it to a login script. It's a Windows application that runs silently (without displaying an interface).
Running this program won't remove a device from the core database. If you redeploy agents to a device that ran this program, it will be stored in the database as a new device.